代码学习
实现代码过程中的一些小demo,之后可能会使用到,记录一下。
一、数据集制作
1、分类同一文件夹中不同后缀名的文件1
2
3
4
5
6
7
8
9
10
11
12
13
14
15
16
17
18
19
20
21
22
23
24
25
26
27
28
29
30
31
32
33
34
35
36
37
38
39
40
41
42
43
44
45
46
47
48
49
50
51
52
53
54
55
56
57
58
59
60
61
62
63
64
65
66
67
68
69import os
import random
from os.path import *
import os
import shutil
# 区分后以txt格式存储
def split(src):
imges = [] # 存储所有图片的路径
annotation = [] # 存储所有xml的路径
# 第一步:遍历需要分离的文件夹
for f in os.listdir(src):
f = os.path.join(src, f)
if f.endswith(".jpg"): # 可以是.jpg,.png,.jpeg等等
imges.append(f)
if f.endswith(".xml"): # 可以是json文件或者xml文件
annotation.append(f)
return imges, annotation
# 区分之后copy到指定文件夹
# def split(src, img, annota):
# imges = [] # 存储所有图片的路径
# annotation = [] # 存储所有xml的路径
# # 第一步:遍历需要分离的文件夹
# for f in os.listdir(src):
# f = os.path.join(src, f)
# if f.endswith(".jpg"): # 可以是.jpg,.png,.jpeg等等
# imges.append(f)
# if f.endswith(".xml"): # 可以是json文件或者xml文件
# annotation.append(f)
# # 第二步:创建目标图片文件夹和xml文件夹
# if not os.path.isdir(img): # 如果目标图片文件夹不存在
# os.mkdir(img)
# if not os.path.isdir(annota): # 如果目标xml文件夹不存在
# os.mkdir(annota)
# # 第三步:转移到目标文件夹中
# for im in imges: # 遍历所有的图片,将图片文件转移到目标文件夹中
# new_path = os.path.join(src, im)
# # print(new_path)
# shutil.copy(new_path, img)
# for ann in annotation: # 遍历所有的xml,将xml文件转移到目标文件夹中
# new_path = os.path.join(src, ann)
# # print(new_path)
# shutil.copy(new_path, annota)
# return imges, annotation
def write_txt(path, flod, data_list):
f = open(os.path.join(path, (flod + ".txt")), 'w')
for fp in data_list:
f.write(str(fp))
f.write("\n")
f.close()
if __name__ == '__main__':
src = 'F:/APP/Pycharm/data/insulator'
image, annotation = split(os.path.join(src, "images")) # 存放的图片路径
image_test, annotation_test = split(os.path.join(src, "images_test")) # 存放的图片路径
image_all = image + image_test
annotation_all = annotation + annotation_test
write_txt(src, "image", image)
write_txt(src, "image_test", image_test)
write_txt(src, "image_all", image_all)
write_txt(src, "annotation", annotation)
write_txt(src, "annotation_test", annotation_test)
write_txt(src, "annotation_all", annotation_all)
2、图像按标注可视化并裁剪1
2
3
4
5
6
7
8
9
10
11
12
13
14
15
16
17
18
19
20
21
22
23
24
25
26
27
28
29
30
31
32
33
34
35
36
37
38
39
40
41
42
43
44
45
46
47
48
49
50
51
52
53
54
55
56
57
58import cv2
from math import *
import numpy as np
import time
def rotateImage(img, degree, pt1, pt2, pt3, pt4):
height, width = img.shape[:2]
heightNew = int(width * fabs(sin(radians(degree))) + height * fabs(cos(radians(degree))))
widthNew = int(height * fabs(sin(radians(degree))) + width * fabs(cos(radians(degree))))
matRotation = cv2.getRotationMatrix2D((width / 2, height / 2), degree, 1)
matRotation[0, 2] += (widthNew - width) / 2
matRotation[1, 2] += (heightNew - height) / 2
imgRotation = cv2.warpAffine(img, matRotation, (widthNew, heightNew), borderValue=(255, 255, 255))
pt1 = list(pt1)
pt3 = list(pt3)
[[pt1[0]], [pt1[1]]] = np.dot(matRotation, np.array([[pt1[0]], [pt1[1]], [1]]))
[[pt3[0]], [pt3[1]]] = np.dot(matRotation, np.array([[pt3[0]], [pt3[1]], [1]]))
imgOut = imgRotation[int(pt1[1]):int(pt3[1]), int(pt1[0]):int(pt3[0])]
# imgOut = cv2.resize(imgOut, (330, 220))
cv2.imshow("imgOut", imgOut) # 裁减得到的旋转矩形框
cv2.imwrite("imgOut.jpg", imgOut)
# pt2 = list(pt2)
# pt4 = list(pt4)
# [[pt2[0]], [pt2[1]]] = np.dot(matRotation, np.array([[pt2[0]], [pt2[1]], [1]]))
# [[pt4[0]], [pt4[1]]] = np.dot(matRotation, np.array([[pt4[0]], [pt4[1]], [1]]))
# pt1 = (int(pt1[0]), int(pt1[1]))
# pt2 = (int(pt2[0]), int(pt2[1]))
# pt3 = (int(pt3[0]), int(pt3[1]))
# pt4 = (int(pt4[0]), int(pt4[1]))
# drawRect(imgRotation,pt1,pt2,pt3,pt4,(255,0,0),2)
return imgRotation
def drawRect(img, pt1, pt2, pt3, pt4, color, lineWidth):
cv2.line(img, pt1, pt2, color, lineWidth)
cv2.line(img, pt2, pt3, color, lineWidth)
cv2.line(img, pt3, pt4, color, lineWidth)
cv2.line(img, pt1, pt4, color, lineWidth)
if __name__ == "__main__":
startTime = time.time()
imgSrc = cv2.imread('F:/APP/Pycharm/data/insulator/images/001501928_K1590435_10000020_1_06.jpg')
box = [(2675, 1706), (435, 1333), 1.0646727181613587 * 180 / np.pi]
contours = (cv2.boxPoints(box) / 10).astype(int)
imgResize = cv2.resize(imgSrc, (660, 440))
# pt1 = (1987 / 10, 1839 / 10)
# pt2 = (3152 / 10, 1193 / 10)
# pt3 = (3363 / 10, 1573 / 10)
# pt4 = (2198 / 10, 2220 / 10)
# drawret(imgResize, contours[0], contours[1], contours[2], contours[3], (0, 0, 255), 2)
imgRotation = rotateImage(imgResize, -degrees(atan2(50, 50)), contours[0], contours[1], contours[2], contours[3])
endTime = time.time()
print(endTime - startTime)
cv2.imshow("imgRotation", imgRotation)
cv2.imwrite("imgRotation.jpg", imgRotation)
cv2.waitKey(0)
此代码有一点问题,有时间再修改,可以使用下面的代码
3、图像按标注裁剪1
2
3
4
5
6
7
8
9
10
11
12
13
14
15
16
17
18
19
20
21
22
23
24
25
26
27
28
29
30
31
32
33
34
35
36
37import cv2
import time
import numpy as np
import shutil
def suofang(im,target_height,target_width):
height, width = im.shape[:2] # 取彩色图片的长、宽。
ratio_h = height / target_height
ration_w = width / target_width
ratio = max(ratio_h, ration_w)
# 缩放图像 resize(...,size)--size(width,height)
size = (int(width / ratio), int(height / ratio))
shrink = cv2.resize(im, size, interpolation=cv2.INTER_AREA) # 双线性插值
BLACK = [0, 0, 0]
a = (target_width - int(width / ratio)) / 2
b = (target_height - int(height / ratio)) / 2
constant = cv2.copyMakeBorder(shrink, int(b), int(b), int(a), int(a), cv2.BORDER_CONSTANT, value=BLACK)
constant = cv2.resize(constant, (target_width, target_height), interpolation=cv2.INTER_AREA)
return constant
if __name__ == "__main__":
startTime = time.time()
img = cv2.imread('F:/APP/Pycharm/data/insulator/crop/1.jpg')
h, w, c = img.shape
row = w if w > h else h
img = cv2.cvtColor(img, cv2.COLOR_RGBA2RGB) # 有个别图片是32位ARGB的,不去除透明通道的话填充边缘的会是白色的
image = suofang(img, 224, 224) # 自己改大小
endTime = time.time()
print(endTime - startTime)
# cv2.imshow("imgRotation", image)
cv2.imwrite("imgRotation.jpg", image)
cv2.waitKey(0)
4、解压1
2
3
4
5
6
7
8
9
10
11
12
13
14
15
16
17
18
19
20
21import os
import zipfile
def unzip(zip_file, root):
# file_path 为zip文件的全路径
# root 为解压后的路径
if zip_file.endswith(".zip"):
# 判断文件的结尾是否为zip结尾
fz = zipfile.ZipFile(zip_file, "r")
for file in fz.namelist():
fz.extract(file, root)
fz.close()
else:
print(fr"{zip_file} this is not zip")
if __name__ =="__main__":
# zip_src源文件夹
# dst_dir目标文件夹
zip_src = "G:/insulator/xxx.zip"
dst_dir = "G:/insulator/insulator1"
unzip(zip_src, dst_dir)
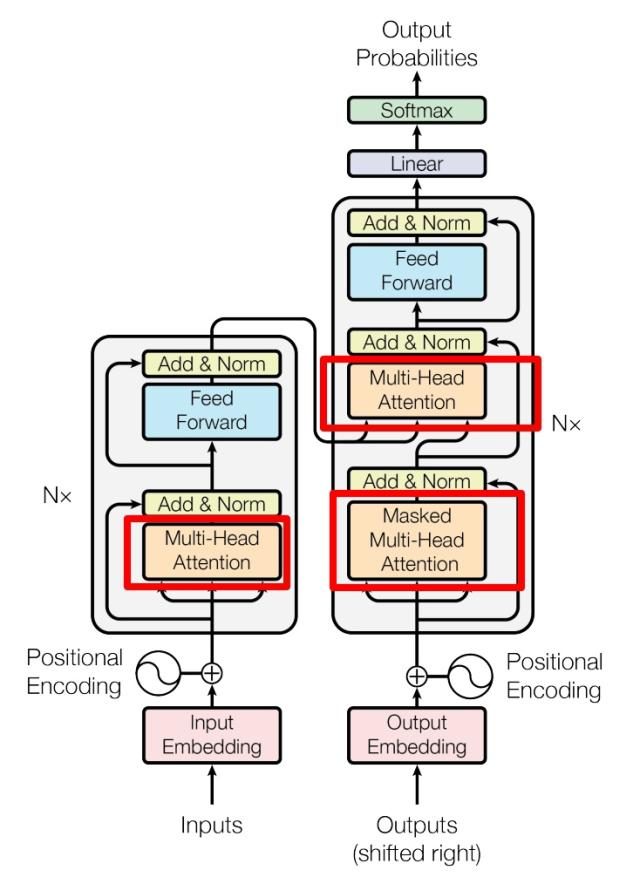
读改MAE代码
1、parse_args()函数
1 | import argparse |
type:把从命令行输入的结果转成设置的类型
default:设置参数的默认值
action:参数出发的动作
help:参数命令的介绍
store_ture/store_false:保存相应的布尔值
choice:允许的参数值
dest:如果提供dest,例如dest=”a”,那么可以通过args.a访问该参数
store:保存参数,默认
store_const:保存一个被定义为参数规格一部分的值(常量),而不是一个来自参数解析而来的值。
append:将值保存在一个列表中。
append_const:将一个定义在参数规格中的值(常量)保存在一个列表中。
count:参数出现的次数
version:打印程序版本信息
2、pathlib.path1
2
3
4
5
6
7
8
9
10
11
12
13
14
15
16
17
18
19
20
21
22from pathlib import Path
p = Path("xxx")
# 常用
p.mkdir() #创建目录
p.cwd() #返回当前目录的路径对象
p.iterdir() #遍历目录的子目录和文件
p.is_dir() #判断是否是目录,返回布尔值
p.is_file() #判断是否是文件,返回布尔值
p.exists() #判断路径是否存在,返回布尔值
p.rename() #重命名目录或文件夹
# 不常用
p.open() #通常用open(p,mode)方式
p.stat() #返回目录或文件信息
p.home() #返回当前用户的根目录
p.with_name() #更改最后一级路劲名
p.with_suffix() #更改后缀
p.is_absolute() #是否是绝对路径
p.is_reserved() #是否是预留路径
p.resolve() #返回绝对路径,WindowsPath
p.unlink() #删除目录或文件
p.glob() #条件遍历目录
3、pytorch中list、ndarray、tensor之间的转化
- list<->ndarray
list->ndarray:np.array(list)
ndarray->list:ndarray.tolist()
list和ndarray的访问:
只能list[i][j]ndarray[i][j]和ndarray[i,j]均可 - ndarray<->tensor
ndarray->tensor:torch.from_numpy(ndarray类型变量)、torch.tensor(ndarray类型变量)
tensor->ndarray:tensor类型变量.numpy()输出:1
2
3
4
5
6
7
8
9
10
11import numpy as np
import torch
at = torch.ones(5)
an = np.ones(5)
bn = at.numpy() # tensor->ndarray
bt = torch.from_numpy(an) # ndarray->tensor
print(at)
print(an)
print(bn)
print(bt)注意:转换期间tensor张量和ndarrayu数组底层内存共享,更改一个量会同时更改另一个量,如:1
2
3
4tensor([1., 1., 1., 1., 1.])
[1. 1. 1. 1. 1.]
[1. 1. 1. 1. 1.]
tensor([1., 1., 1., 1., 1.], dtype=torch.float64)输出:1
2
3
4
5at += 5
print(at)
print(an)
print(bn)
print(bt)如果需要接触这种绑定,可以使用ndarray中的1
2
3
4tensor([6., 6., 6., 6., 6.])
[1. 1. 1. 1. 1.]
[6. 6. 6. 6. 6.]
tensor([1., 1., 1., 1., 1.], dtype=torch.float64).copy()函数:输出:1
2
3
4
5
6
7
8
9cn = at.numpy().copy()
ct = torch.from_numpy(bn.copy())
at -= 5
print(at)
print(an)
print(bn)
print(bt)
print(cn)
print(ct)可以看到使用了1
2
3
4
5
6tensor([1., 1., 1., 1., 1.])
[1. 1. 1. 1. 1.]
[1. 1. 1. 1. 1.]
tensor([1., 1., 1., 1., 1.], dtype=torch.float64)
[6. 6. 6. 6. 6.]
tensor([6., 6., 6., 6., 6.]).copy()进行转化的cn、ct不受at -= 5的影响值不变。
另外,使用torch.tensor()由ndarray生成tensor也不是内存共享的,输出:1
2
3
4
5
6
7a = np.ones(3)
b = torch.tensor(a)
print(a)
print(b)
a += 3
print(a)
print(b)1
2
3
4[1. 1. 1.]
tensor([1., 1., 1.], dtype=torch.float64)
[4. 4. 4.]
tensor([1., 1., 1.], dtype=torch.float64) - list<->tensor
list->tensor:torch.tensor(list类型变量)、torch.from_numpy(np.array(l))(list->ndarray->tensor)
tensor->list:tensor.tolist()、tensor.numpy().tolist()(tensor->ndarray->list) - list字符与数字的转化输出:
1
2
3string_list=['1.0','2.0','3.0']
float_list=list(map(float,string_list))
print(float_list)1
[1.0, 2.0, 3.0]
 微信
微信 支付宝
支付宝